You can test your Android apps on an Android Virtual Device, instead on actual mobile hardware. If you emulate an ARM Android device, the performance will be low though. For faster emulation, it is better to emulate an x86 Android device.
Step 1
Make sure your Intel CPU is capable of virtualization, and go into your BIOS settings to make sure the virtualization feature of your CPU is enabled. You can also check from your command prompt by install cpu-checker package, and then run: sudo kvm-ok on the command line. You should see the report 'KVM acceleration can be used.'
Step 2
Install the correct parts of the Android SDK. Run on the command line: 'android' and install for your desired target (I use API level 19) install the Intel x86 Atom System Image.
Step 3
Start the AVD tool. On the command line, execute 'android avd' to open the tool.
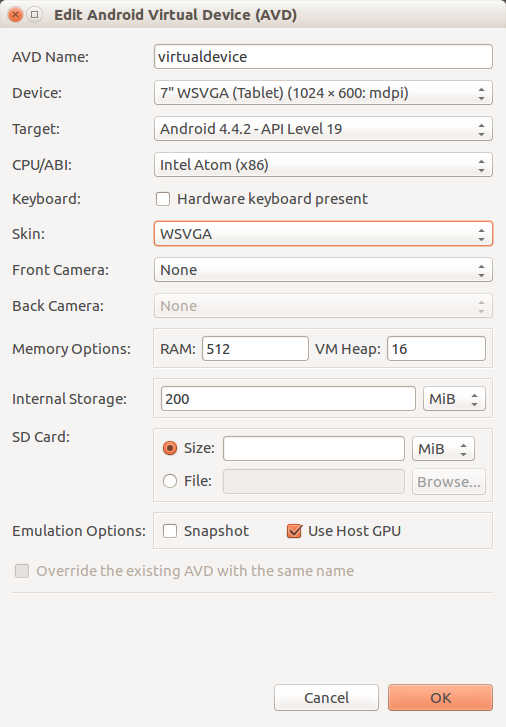
Step 4
Select Create Device. Make sure to select Target: API level 19, and set the field CPU/ABI: Intel Atom (x86) as well. If you are using Google APIs, like Google Play Services, you should select the ABI: Google APIs Intel Atom (x86) instead. Don't forget to tick the Use Host GPU checkbox.
Step 5
Launch the virtual device by selecting 'Start' on the AVD tool.
Step 6
See if adb finds your virtual device with: 'adb devices' on the command line. Note the serial number for your device.
Step 7
Install your apk file using: adb -s emulator-5554 install bin/yourapp.apk
Enjoy the super fast emulation performance!
KNOWN ISSUES
If my app requests an OpenGL ES3 context, it fails:
E/EGL_emulation( 2463): tid 2476: eglCreateContext(919): error 0x3005 (EGL_BAD_CONFIG)
Final PRO-tip: Targeting API level 19 is your best bet, because running higher level APIs can cause crashes on older devices. To fix this, Google recommends actually shipping multiple APKs no less! Read more on this stackoverflow thread.